
I’ve brought a Creality Ender 3. This is one of the cheapest 3D printers available and as many people were giving it good reviews on YouTube, decided to take the plunge at £165 on eBay. It was shipped locally from the UK and arrived quickly.
First impressions on unpacking were very favourable. All the parts came neatly labelled and I especially liked the small plastic bags with extra spare parts for screws, washers and other attachments. They also supplied a full set of tools including side cutters, hex spanners, zip ties and even a platen scraper to free models from the bed. This is a quality product and is very complete for the price.
But the bed levelling is a disaster. Full disclosure – I may not know the slightest what I am doing, and all this could be a noob’s series of mistakes.
As I understand it, bed levelling is either done automatically with presence or induction sensors on higher-end machines, and manually on lower-end machines such as the Ender 3. While there is an after-market 3rd add-on available, I only have the stock machine. The whole idea of levelling is to make the plane of the print head x-y axis’s parallel to the plane of the printed material – more correctly known as ‘tramming‘ by machine operators. This is done by adjusting the bed to within a paper’s width of the print head, by moving the print head to the four corners and moving the bed up or down.
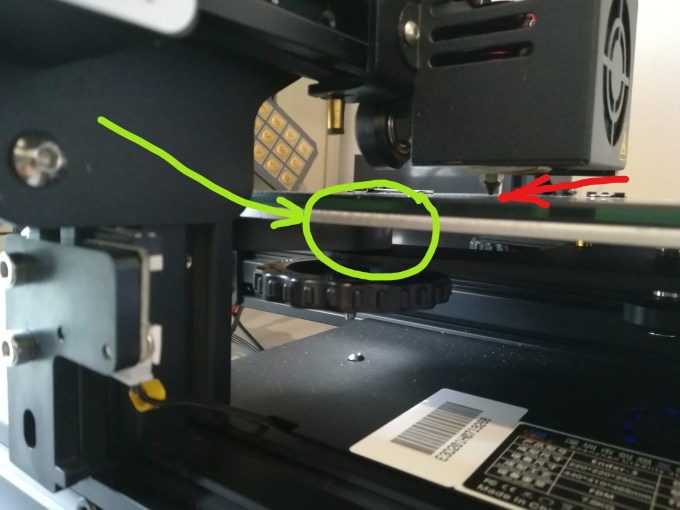
I did this, and could not ever get it level. There was never enough play length on the bed screws to adjust the amount needed. The issue seems to be that the side z-stop sensor is too high – even the installation instructions mention that it should be “~32mm” from the bracket bottom to the underside of the machine – however there was a lug on the printed bracket which would not let it descend to that level and held it at 35mm height.
- I removed the lug and set the z-stop to the suggested 32mm above base level. The bed was now too high and the auto-home feature would have broken the glass platen if I had not switched off the machine.

- Still not enough play, so move the z-stop higher. I can adjust the front thumb-screw enough and I am hopeful (- and this would work with the stock epoxy bed cover, not the glass one which is thicker). Still not enough play in the back thumb screws, especially the left rear. Heated bed electrics are in way. That spring is at the tightest depression while the nozzle is touching the glass.
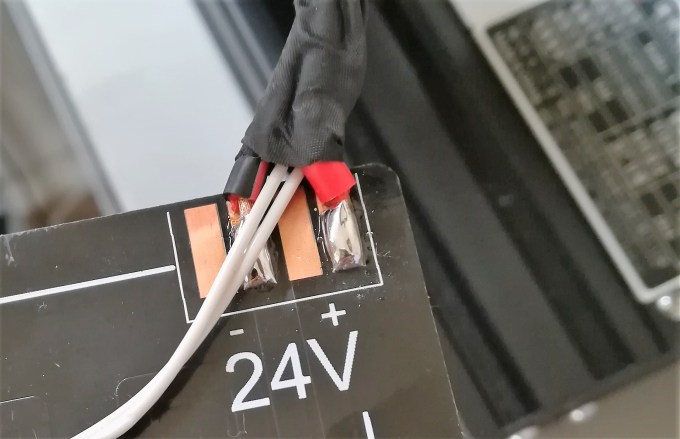
- So I removed the rear heated bed bracket, remounted without the bracket and now I get a lot more travel in the height at the rear. That leaves the heated bed electric exposed but I can live with that for a while.
Much better. Now on to levelling the bed with the paper shim and manually moving the print head to the four corners.
I can either build a new support for the 24V electric line using Sugru or more likely, once I come up to speed with TinkerCAD and Cura or whatever software I start using, I can 3D print a new one.
It is a superb machine and very worthy of the kudos being given it on the internet – just be prepared to do a little work with it to get it running at its best.

Did you ever figure out a way to get around this issue without removing the stop? I feel like there must be something we’re missing
No, and removing the lug is fairly harmless – it doesn’t preclude moving the end stop up or down. However I’d comment that it is likely related to the type of bed. Use the stock one and the lug removal won’t be necessary, use a glass bed and the surface is 4mm too high, use a magnetic foam bed with flexible steel sheet and PEI as I do now and I had to *raise* the z-stop. These little Ender-3’s should come with a warning: “some tinkering required”. I purchased another on eBay as a return at half price and all it needed was one of the 2040 extrusions drilled and re-tapped, I guess the original purchaser couldn’t get it to work out of the box?